インジェストパイプライン
インジェストパイプラインを使用すると、インデックス作成前にデータに対して一般的な変換を実行できます。たとえば、パイプラインを使用してフィールドを削除したり、テキストから値を抽出したり、データを強化したりできます。
パイプラインは、プロセッサと呼ばれる一連の構成可能なタスクで構成されています。各プロセッサは順次実行され、受信したドキュメントに特定の変更を加えます。プロセッサが実行された後、Elasticsearchは変換されたドキュメントをデータストリームまたはインデックスに追加します。

Kibanaのインジェストパイプライン機能またはインジェストAPIを使用して、インジェストパイプラインを作成および管理できます。Elasticsearchは、クラスタ状態にパイプラインを保存します。
前提条件
ingestノードロールを持つノードがパイプライン処理を処理します。インジェストパイプラインを使用するには、クラスターに少なくとも1つのingestロールを持つノードが必要です。重いインジェスト負荷の場合は、専用のインジェストノードを作成することをお勧めします。- Elasticsearchのセキュリティ機能が有効になっている場合、インジェストパイプラインを管理するには、
manage_pipelineクラスタ特権を持っている必要があります。Kibanaのインジェストパイプライン機能を使用するには、cluster:monitor/nodes/infoクラスタ特権も必要です。 enrichプロセッサを含むパイプラインには追加の設定が必要です。詳細はデータを強化するを参照してください。
パイプラインの作成と管理
Kibanaで、メインメニューを開き、**スタック管理
インジェスト パイプライン**をクリックします。リストビューから、次のことができます:
- パイプラインのリストを表示し、詳細を掘り下げる
- 既存のパイプラインを編集または複製する
パイプラインを削除する

パイプラインを作成するには、**パイプラインを作成
新しいパイプライン*をクリックします。チュートリアルの例については、[例:ログの解析*](/read/elasticsearch-8-15/4ffc62b2cad80217.md)を参照してください。
CSVから新しいパイプラインオプションを使用すると、CSVを使用してカスタムデータをElastic Common Schema (ECS)にマッピングするインジェストパイプラインを作成できます。カスタムデータをECSにマッピングすると、データの検索が容易になり、他のデータセットからの視覚化を再利用できます。始めるには、カスタムデータをECSにマッピングするを確認してください。
また、インジェストAPIを使用してパイプラインを作成および管理することもできます。次のパイプライン作成APIリクエストは、2つのsetプロセッサとlowercaseプロセッサを含むパイプラインを作成します。プロセッサは指定された順序で順次実行されます。
Python
resp = client.ingest.put_pipeline(id="my-pipeline",description="My optional pipeline description",processors=[{"set": {"description": "My optional processor description","field": "my-long-field","value": 10}},{"set": {"description": "Set 'my-boolean-field' to true","field": "my-boolean-field","value": True}},{"lowercase": {"field": "my-keyword-field"}}],)print(resp)
Ruby
response = client.ingest.put_pipeline(id: 'my-pipeline',body: {description: 'My optional pipeline description',processors: [{set: {description: 'My optional processor description',field: 'my-long-field',value: 10}},{set: {description: "Set 'my-boolean-field' to true",field: 'my-boolean-field',value: true}},{lowercase: {field: 'my-keyword-field'}}]})puts response
Js
const response = await client.ingest.putPipeline({id: "my-pipeline",description: "My optional pipeline description",processors: [{set: {description: "My optional processor description",field: "my-long-field",value: 10,},},{set: {description: "Set 'my-boolean-field' to true",field: "my-boolean-field",value: true,},},{lowercase: {field: "my-keyword-field",},},],});console.log(response);
Console
PUT _ingest/pipeline/my-pipeline{"description": "My optional pipeline description","processors": [{"set": {"description": "My optional processor description","field": "my-long-field","value": 10}},{"set": {"description": "Set 'my-boolean-field' to true","field": "my-boolean-field","value": true}},{"lowercase": {"field": "my-keyword-field"}}]}
パイプラインバージョンの管理
パイプラインを作成または更新する際に、オプションのversion整数を指定できます。このバージョン番号をif_versionパラメータと共に使用して、条件付きでパイプラインを更新できます。if_versionパラメータが指定されている場合、成功した更新によりパイプラインのバージョンが増加します。
Console
PUT _ingest/pipeline/my-pipeline-id{"version": 1,"processors": [ ... ]}
APIを使用してversion番号を解除するには、versionパラメータを指定せずにパイプラインを置き換えるか更新します。
パイプラインのテスト
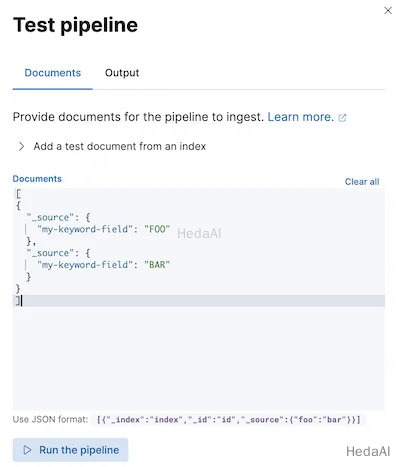
パイプラインを本番環境で使用する前に、サンプルドキュメントを使用してテストすることをお勧めします。Kibanaでパイプラインを作成または編集する際に、ドキュメントを追加をクリックします。ドキュメントタブで、サンプルドキュメントを提供し、パイプラインを実行をクリックします。

また、シミュレートパイプラインAPIを使用してパイプラインをテストすることもできます。リクエストパスに構成されたパイプラインを指定できます。たとえば、次のリクエストはmy-pipelineをテストします。
Python
resp = client.ingest.simulate(id="my-pipeline",docs=[{"_source": {"my-keyword-field": "FOO"}},{"_source": {"my-keyword-field": "BAR"}}],)print(resp)
Ruby
response = client.ingest.simulate(id: 'my-pipeline',body: {docs: [{_source: {"my-keyword-field": 'FOO'}},{_source: {"my-keyword-field": 'BAR'}}]})puts response
Js
const response = await client.ingest.simulate({id: "my-pipeline",docs: [{_source: {"my-keyword-field": "FOO",},},{_source: {"my-keyword-field": "BAR",},},],});console.log(response);
Console
POST _ingest/pipeline/my-pipeline/_simulate{"docs": [{"_source": {"my-keyword-field": "FOO"}},{"_source": {"my-keyword-field": "BAR"}}]}
リクエストボディにパイプラインとそのプロセッサを指定することもできます。
Python
resp = client.ingest.simulate(pipeline={"processors": [{"lowercase": {"field": "my-keyword-field"}}]},docs=[{"_source": {"my-keyword-field": "FOO"}},{"_source": {"my-keyword-field": "BAR"}}],)print(resp)
Ruby
response = client.ingest.simulate(body: {pipeline: {processors: [{lowercase: {field: 'my-keyword-field'}}]},docs: [{_source: {"my-keyword-field": 'FOO'}},{_source: {"my-keyword-field": 'BAR'}}]})puts response
Js
const response = await client.ingest.simulate({pipeline: {processors: [{lowercase: {field: "my-keyword-field",},},],},docs: [{_source: {"my-keyword-field": "FOO",},},{_source: {"my-keyword-field": "BAR",},},],});console.log(response);
Console
POST _ingest/pipeline/_simulate{"pipeline": {"processors": [{"lowercase": {"field": "my-keyword-field"}}]},"docs": [{"_source": {"my-keyword-field": "FOO"}},{"_source": {"my-keyword-field": "BAR"}}]}
Console-Result
{"docs": [{"doc": {"_index": "_index","_id": "_id","_version": "-3","_source": {"my-keyword-field": "foo"},"_ingest": {"timestamp": "2099-03-07T11:04:03.000Z"}}},{"doc": {"_index": "_index","_id": "_id","_version": "-3","_source": {"my-keyword-field": "bar"},"_ingest": {"timestamp": "2099-03-07T11:04:04.000Z"}}}]}
インデックスリクエストにパイプラインを追加
#### Python``````pythonresp = client.index(index="my-data-stream",pipeline="my-pipeline",document={"@timestamp": "2099-03-07T11:04:05.000Z","my-keyword-field": "foo"},)print(resp)resp1 = client.bulk(index="my-data-stream",pipeline="my-pipeline",operations=[{"create": {}},{"@timestamp": "2099-03-07T11:04:06.000Z","my-keyword-field": "foo"},{"create": {}},{"@timestamp": "2099-03-07T11:04:07.000Z","my-keyword-field": "bar"}],)print(resp1)`
Ruby
response = client.index(index: 'my-data-stream',pipeline: 'my-pipeline',body: {"@timestamp": '2099-03-07T11:04:05.000Z',"my-keyword-field": 'foo'})puts responseresponse = client.bulk(index: 'my-data-stream',pipeline: 'my-pipeline',body: [{create: {}},{"@timestamp": '2099-03-07T11:04:06.000Z',"my-keyword-field": 'foo'},{create: {}},{"@timestamp": '2099-03-07T11:04:07.000Z',"my-keyword-field": 'bar'}])puts response
Js
const response = await client.index({index: "my-data-stream",pipeline: "my-pipeline",document: {"@timestamp": "2099-03-07T11:04:05.000Z","my-keyword-field": "foo",},});console.log(response);const response1 = await client.bulk({index: "my-data-stream",pipeline: "my-pipeline",operations: [{create: {},},{"@timestamp": "2099-03-07T11:04:06.000Z","my-keyword-field": "foo",},{create: {},},{"@timestamp": "2099-03-07T11:04:07.000Z","my-keyword-field": "bar",},],});console.log(response1);
Console
POST my-data-stream/_doc?pipeline=my-pipeline{"@timestamp": "2099-03-07T11:04:05.000Z","my-keyword-field": "foo"}PUT my-data-stream/_bulk?pipeline=my-pipeline{ "create":{ } }{ "@timestamp": "2099-03-07T11:04:06.000Z", "my-keyword-field": "foo" }{ "create":{ } }{ "@timestamp": "2099-03-07T11:04:07.000Z", "my-keyword-field": "bar" }
また、update by queryまたはreindex APIでpipelineパラメータを使用することもできます。
Python
resp = client.update_by_query(index="my-data-stream",pipeline="my-pipeline",)print(resp)resp1 = client.reindex(source={"index": "my-data-stream"},dest={"index": "my-new-data-stream","op_type": "create","pipeline": "my-pipeline"},)print(resp1)
Ruby
response = client.update_by_query(index: 'my-data-stream',pipeline: 'my-pipeline')puts responseresponse = client.reindex(body: {source: {index: 'my-data-stream'},dest: {index: 'my-new-data-stream',op_type: 'create',pipeline: 'my-pipeline'}})puts response
Js
const response = await client.updateByQuery({index: "my-data-stream",pipeline: "my-pipeline",});console.log(response);const response1 = await client.reindex({source: {index: "my-data-stream",},dest: {index: "my-new-data-stream",op_type: "create",pipeline: "my-pipeline",},});console.log(response1);
Console
POST my-data-stream/_update_by_query?pipeline=my-pipelinePOST _reindex{"source": {"index": "my-data-stream"},"dest": {"index": "my-new-data-stream","op_type": "create","pipeline": "my-pipeline"}}
デフォルトパイプラインの設定
index.default_pipelineインデックス設定を使用してデフォルトパイプラインを設定します。pipelineパラメータが指定されていない場合、Elasticsearchはこのパイプラインをインデックスリクエストに適用します。
最終パイプラインの設定
index.final_pipelineインデックス設定を使用して最終パイプラインを設定します。Elasticsearchは、リクエストまたはデフォルトパイプラインの後にこのパイプラインを適用します。指定されていない場合でも適用されます。
Beats用のパイプライン
Elastic Beatにインジェストパイプラインを追加するには、pipelineパラメータをoutput.elasticsearchの下に<BEAT_NAME>.ymlで指定します。たとえば、Filebeatの場合、pipelineをfilebeat.ymlで指定します。
Yaml
output.elasticsearch:hosts: ["localhost:9200"]pipeline: my-pipeline
FleetおよびElastic Agent用のパイプライン
Elastic Agentの統合には、データをインデックス作成前に前処理および強化するデフォルトのインジェストパイプラインが付属しています。Fleetは、パイプラインインデックス設定を含むインデックステンプレートを使用してこれらのパイプラインを適用します。Elasticsearchは、ストリームの命名スキームに基づいて、これらのテンプレートをFleetデータストリームに一致させます。
各デフォルト統合パイプラインは、存在しないバージョン管理されていない*@customインジェストパイプラインを呼び出します。変更されていない場合、このパイプライン呼び出しはデータに影響を与えません。ただし、この呼び出しを変更して、アップグレードを超えて持続する統合用のカスタムパイプラインを作成できます。チュートリアル:カスタムインジェストパイプラインでデータを変換するを参照して詳細を学んでください。
Fleetは、カスタムログ統合のデフォルトインジェストパイプラインを提供しませんが、インデックステンプレートまたはカスタム構成を使用してこの統合のためのパイプラインを指定できます。
- 1. 作成し、テストしてインジェストパイプラインを作成します。パイプラインに
logs-<dataset-name>-defaultという名前を付けます。これにより、統合のためのパイプラインの追跡が容易になります。
たとえば、次のリクエストはmy-appデータセットのためのパイプラインを作成します。パイプラインの名前はlogs-my_app-defaultです。
Console
PUT _ingest/pipeline/logs-my_app-default{"description": "Pipeline for `my_app` dataset","processors": [ ... ]}
- 2. インデックステンプレートを作成し、
index.default_pipelineまたはindex.final_pipelineインデックス設定にパイプラインを含めます。テンプレートがdata stream enabledであることを確認してください。テンプレートのインデックスパターンはlogs-<dataset-name>-*と一致する必要があります。
このテンプレートは、Kibanaのインデックス
管理機能またはインデックステンプレート作成APIを使用して作成できます。
たとえば、次のリクエストはlogs-my_app-*と一致するテンプレートを作成します。テンプレートは、index.default_pipelineインデックス設定を含むコンポーネントテンプレートを使用します。
Python
resp = client.cluster.put_component_template(name="logs-my_app-settings",template={"settings": {"index.default_pipeline": "logs-my_app-default","index.lifecycle.name": "logs"}},)print(resp)resp1 = client.indices.put_index_template(name="logs-my_app-template",index_patterns=["logs-my_app-*"],data_stream={},priority=500,composed_of=["logs-my_app-settings","logs-my_app-mappings"],)print(resp1)
Js
const response = await client.cluster.putComponentTemplate({name: "logs-my_app-settings",template: {settings: {"index.default_pipeline": "logs-my_app-default","index.lifecycle.name": "logs",},},});console.log(response);const response1 = await client.indices.putIndexTemplate({name: "logs-my_app-template",index_patterns: ["logs-my_app-*"],data_stream: {},priority: 500,composed_of: ["logs-my_app-settings", "logs-my_app-mappings"],});console.log(response1);
Console
# インデックス設定のためのコンポーネントテンプレートを作成PUT _component_template/logs-my_app-settings{"template": {"settings": {"index.default_pipeline": "logs-my_app-default","index.lifecycle.name": "logs"}}}# `logs-my_app-*`に一致するインデックステンプレートを作成PUT _index_template/logs-my_app-template{"index_patterns": ["logs-my_app-*"],"data_stream": { },"priority": 500,"composed_of": ["logs-my_app-settings", "logs-my_app-mappings"]}
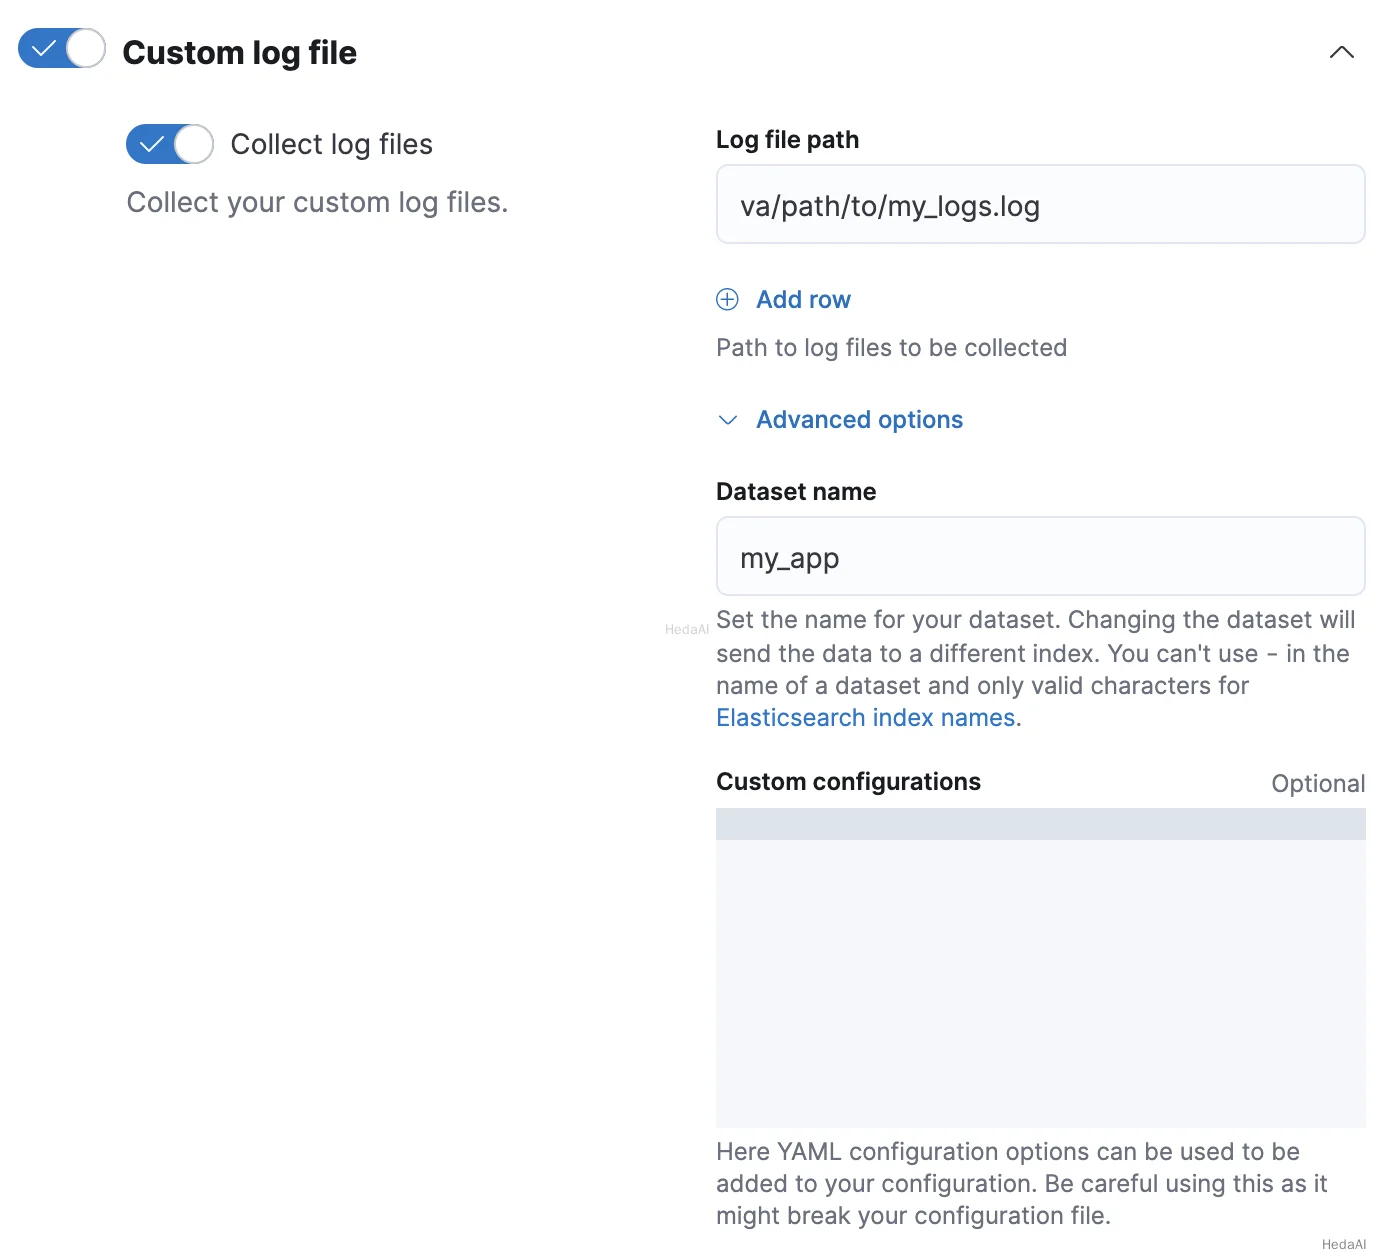
- 3. Fleetでカスタムログ統合を追加または編集する際に、**統合の構成
カスタムログファイル
高度なオプション**をクリックします。 - 4. データセット名に、データセットの名前を指定します。Fleetは、結果の
logs-<dataset-name>-defaultデータストリームに統合のための新しいデータを追加します。
たとえば、データセットの名前がmy_appの場合、Fleetはlogs-my_app-defaultデータストリームに新しいデータを追加します。
- 5. ロールオーバーAPIを使用してデータストリームをロールオーバーします。これにより、Elasticsearchはインデックステンプレートとそのパイプライン設定を統合の新しいデータに適用します。
Python
resp = client.indices.rollover(alias="logs-my_app-default",)print(resp)
Ruby
response = client.indices.rollover(alias: 'logs-my_app-default')puts response
Js
const response = await client.indices.rollover({alias: "logs-my_app-default",});console.log(response);
Console
POST logs-my_app-default/_rollover/
- 1. 作成し、テストしてインジェストパイプラインを作成します。パイプラインに
logs-<dataset-name>-defaultという名前を付けます。これにより、統合のためのパイプラインの追跡が容易になります。
たとえば、次のリクエストはmy-appデータセットのためのパイプラインを作成します。パイプラインの名前はlogs-my_app-defaultです。
Console
PUT _ingest/pipeline/logs-my_app-default{"description": "Pipeline for `my_app` dataset","processors": [ ... ]}
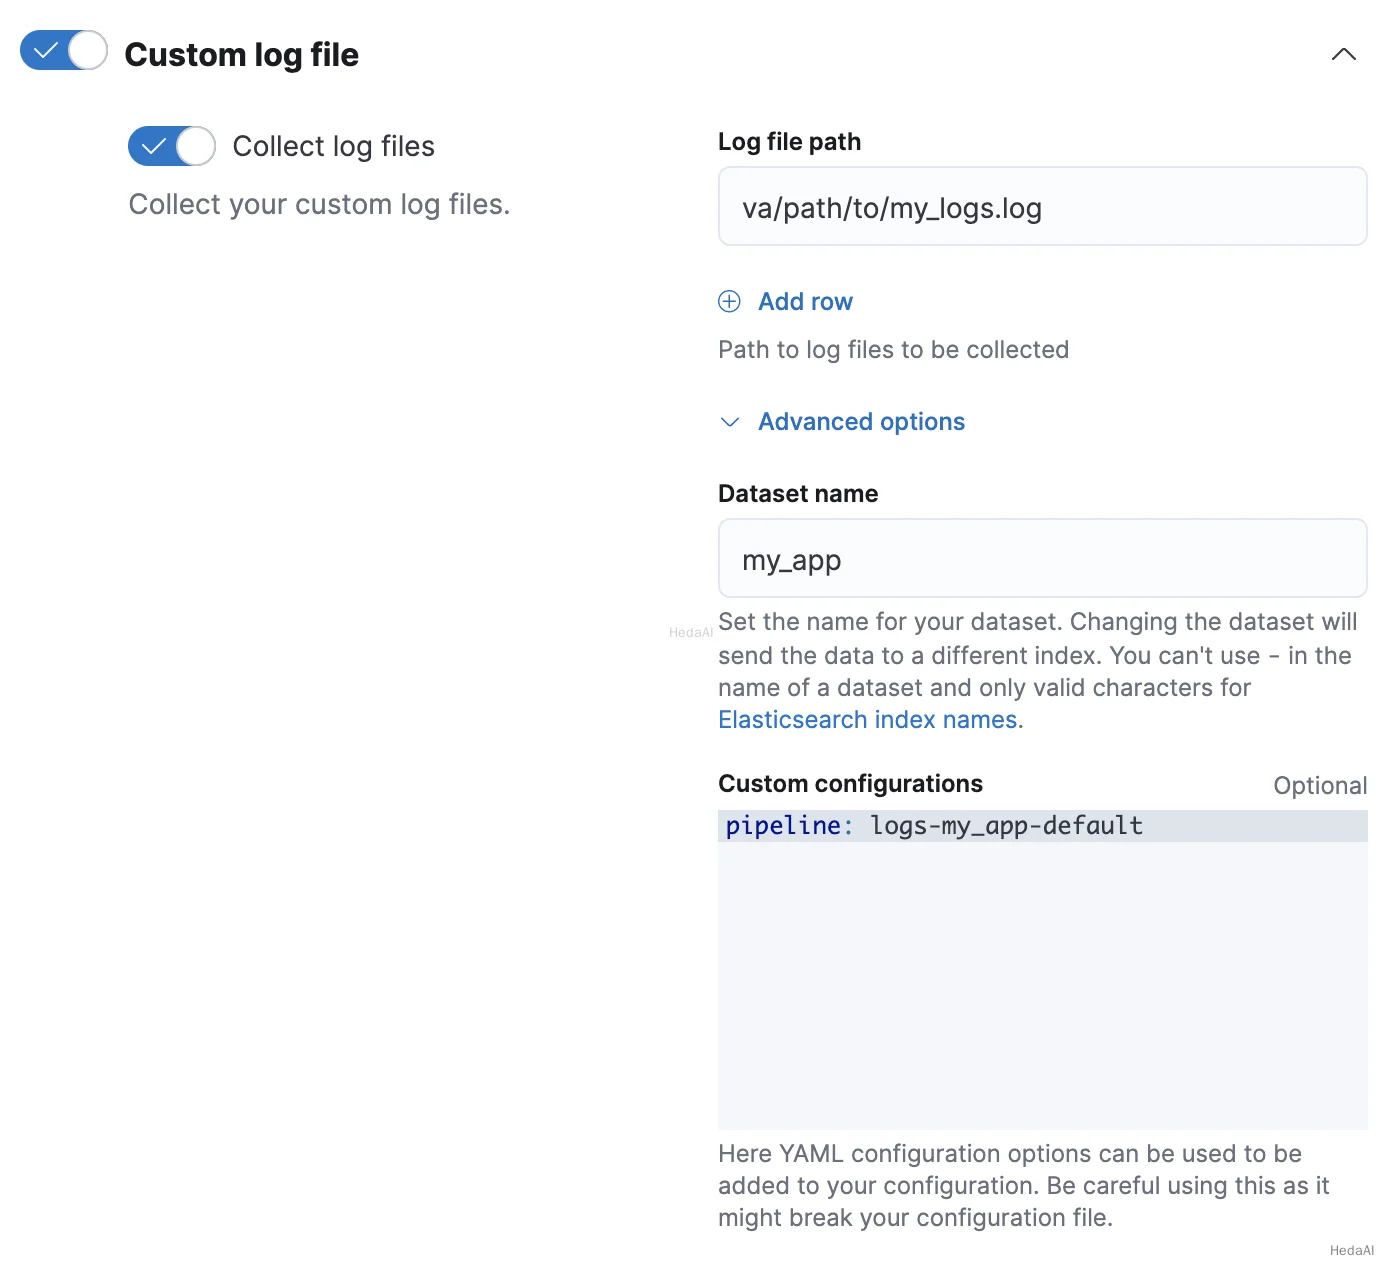
- 2. Fleetでカスタムログ統合を追加または編集する際に、**統合の構成
カスタムログファイル
高度なオプション**をクリックします。 - 3. データセット名に、データセットの名前を指定します。Fleetは、結果の
logs-<dataset-name>-defaultデータストリームに統合のための新しいデータを追加します。
たとえば、データセットの名前がmy_appの場合、Fleetはlogs-my_app-defaultデータストリームに新しいデータを追加します。 - 4. カスタム構成で、
pipelineポリシー設定にパイプラインを指定します。
Elastic Agentスタンドアロン
Elastic Agentをスタンドアロンで実行している場合、インデックステンプレートを使用して、index.default_pipelineまたはindex.final_pipelineインデックス設定を含めることができます。あるいは、pipelineポリシー設定をelastic-agent.yml構成に指定できます。スタンドアロンElastic Agentsのインストールを参照してください。
検索インデックス用のパイプライン
検索ユースケースのためにElasticsearchインデックスを作成する際、たとえば、ウェブクローラーやコネクタを使用する場合、これらのインデックスは特定のインジェストパイプラインで自動的に設定されます。これらのプロセッサは、検索のためにコンテンツを最適化するのに役立ちます。詳細については検索におけるインジェストパイプラインを参照してください。
プロセッサ内でソースフィールドにアクセス
プロセッサは、受信ドキュメントのソースフィールドに対して読み取りおよび書き込みアクセスを持っています。プロセッサ内でフィールドキーにアクセスするには、そのフィールド名を使用します。次のsetプロセッサはmy-long-fieldにアクセスします。
Python
resp = client.ingest.put_pipeline(id="my-pipeline",processors=[{"set": {"field": "my-long-field","value": 10}}],)print(resp)
Ruby
response = client.ingest.put_pipeline(id: 'my-pipeline',body: {processors: [{set: {field: 'my-long-field',value: 10}}]})puts response
Js
const response = await client.ingest.putPipeline({id: "my-pipeline",processors: [{set: {field: "my-long-field",value: 10,},},],});console.log(response);
Console
PUT _ingest/pipeline/my-pipeline{"processors": [{"set": {"field": "my-long-field","value": 10}}]}
#### Python``````pythonresp = client.ingest.put_pipeline(id="my-pipeline",processors=[{"set": {"field": "_source.my-long-field","value": 10}}],)print(resp)`
Ruby
response = client.ingest.put_pipeline(id: 'my-pipeline',body: {processors: [{set: {field: '_source.my-long-field',value: 10}}]})puts response
Js
const response = await client.ingest.putPipeline({id: "my-pipeline",processors: [{set: {field: "_source.my-long-field",value: 10,},},],});console.log(response);
Console
PUT _ingest/pipeline/my-pipeline{"processors": [{"set": {"field": "_source.my-long-field","value": 10}}]}
オブジェクトフィールドにアクセスするには、ドット表記を使用します。
ドキュメントにフラット化されたオブジェクトが含まれている場合は、最初にdot_expanderプロセッサを使用してそれらを展開してください。他のインジェストプロセッサはフラット化されたオブジェクトにアクセスできません。
Python
resp = client.ingest.put_pipeline(id="my-pipeline",processors=[{"dot_expander": {"description": "Expand 'my-object-field.my-property'","field": "my-object-field.my-property"}},{"set": {"description": "Set 'my-object-field.my-property' to 10","field": "my-object-field.my-property","value": 10}}],)print(resp)
Ruby
response = client.ingest.put_pipeline(id: 'my-pipeline',body: {processors: [{dot_expander: {description: "Expand 'my-object-field.my-property'",field: 'my-object-field.my-property'}},{set: {description: "Set 'my-object-field.my-property' to 10",field: 'my-object-field.my-property',value: 10}}]})puts response
Js
const response = await client.ingest.putPipeline({id: "my-pipeline",processors: [{dot_expander: {description: "Expand 'my-object-field.my-property'",field: "my-object-field.my-property",},},{set: {description: "Set 'my-object-field.my-property' to 10",field: "my-object-field.my-property",value: 10,},},],});console.log(response);
Console
PUT _ingest/pipeline/my-pipeline{"processors": [{"dot_expander": {"description": "Expand 'my-object-field.my-property'","field": "my-object-field.my-property"}},{"set": {"description": "Set 'my-object-field.my-property' to 10","field": "my-object-field.my-property","value": 10}}]}
いくつかのプロセッサパラメータは、Mustacheテンプレートスニペットをサポートしています。テンプレートスニペット内でフィールド値にアクセスするには、フィールド名を三重の波括弧で囲みます:{{{field-name}}}。テンプレートスニペットを使用して、フィールド名を動的に設定できます。
Python
resp = client.ingest.put_pipeline(id="my-pipeline",processors=[{"set": {"description": "Set dynamic '<service>' field to 'code' value","field": "{{{service}}}","value": "{{{code}}}"}}],)print(resp)
Ruby
response = client.ingest.put_pipeline(id: 'my-pipeline',body: {processors: [{set: {description: "Set dynamic '<service>' field to 'code' value",field: '{{{service}}}',value: '{{{code}}}'}}]})puts response
Js
const response = await client.ingest.putPipeline({id: "my-pipeline",processors: [{set: {description: "Set dynamic '<service>' field to 'code' value",field: "{{{service}}}",value: "{{{code}}}",},},],});console.log(response);
Console
PUT _ingest/pipeline/my-pipeline{"processors": [{"set": {"description": "Set dynamic '<service>' field to 'code' value","field": "{{{service}}}","value": "{{{code}}}"}}]}
プロセッサ内でメタデータフィールドにアクセス
プロセッサは、次のメタデータフィールドに名前でアクセスできます:
_index_id_routing_dynamic_templates
Python
resp = client.ingest.put_pipeline(id="my-pipeline",processors=[{"set": {"description": "Set '_routing' to 'geoip.country_iso_code' value","field": "_routing","value": "{{{geoip.country_iso_code}}}"}}],)print(resp)
Ruby
response = client.ingest.put_pipeline(id: 'my-pipeline',body: {processors: [{set: {description: "Set '_routing' to 'geoip.country_iso_code' value",field: '_routing',value: '{{{geoip.country_iso_code}}}'}}]})puts response
Js
const response = await client.ingest.putPipeline({id: "my-pipeline",processors: [{set: {description: "Set '_routing' to 'geoip.country_iso_code' value",field: "_routing",value: "{{{geoip.country_iso_code}}}",},},],});console.log(response);
Console
PUT _ingest/pipeline/my-pipeline{"processors": [{"set": {"description": "Set '_routing' to 'geoip.country_iso_code' value","field": "_routing","value": "{{{geoip.country_iso_code}}}"}}]}
Mustacheテンプレートスニペットを使用してメタデータフィールド値にアクセスします。たとえば、{{{_routing}}}はドキュメントのルーティング値を取得します。
Python
resp = client.ingest.put_pipeline(id="my-pipeline",processors=[{"set": {"description": "Use geo_point dynamic template for address field","field": "_dynamic_templates","value": {"address": "geo_point"}}}],)print(resp)
Ruby
response = client.ingest.put_pipeline(id: 'my-pipeline',body: {processors: [{set: {description: 'Use geo_point dynamic template for address field',field: '_dynamic_templates',value: {address: 'geo_point'}}}]})puts response
Js
const response = await client.ingest.putPipeline({id: "my-pipeline",processors: [{set: {description: "Use geo_point dynamic template for address field",field: "_dynamic_templates",value: {address: "geo_point",},},},],});console.log(response);
Console
PUT _ingest/pipeline/my-pipeline{"processors": [{"set": {"description": "Use geo_point dynamic template for address field","field": "_dynamic_templates","value": {"address": "geo_point"}}}]}
上記のセットプロセッサは、フィールドaddressがまだインデックスのマッピングで定義されていない場合、geo_pointという名前の動的テンプレートを使用するようにESに指示します。このプロセッサは、バルクリクエストで既に定義されているフィールドaddressに対して動的テンプレートをオーバーライドしますが、バルクリクエストで定義された他の動的テンプレートには影響を与えません。
ドキュメントIDを自動生成する場合、プロセッサ内で{{{_id}}}を使用することはできません。Elasticsearchは、インジェスト後に自動生成された_id値を割り当てます。
プロセッサ内でインジェストメタデータにアクセス
インジェストプロセッサは、_ingestキーを使用してインジェストメタデータを追加およびアクセスできます。
ソースおよびメタデータフィールドとは異なり、Elasticsearchはデフォルトでインジェストメタデータフィールドをインデックスしません。Elasticsearchは、_ingestキーで始まるソースフィールドも許可します。データにそのようなソースフィールドが含まれている場合は、_source._ingestを使用してアクセスします。
パイプラインはデフォルトで_ingest.timestampインジェストメタデータフィールドのみを作成します。このフィールドには、Elasticsearchがドキュメントのインデックス作成リクエストを受信した時刻のタイムスタンプが含まれます。_ingest.timestampまたは他のインジェストメタデータフィールドをインデックスするには、setプロセッサを使用します。
Python
resp = client.ingest.put_pipeline(id="my-pipeline",processors=[{"set": {"description": "Index the ingest timestamp as 'event.ingested'","field": "event.ingested","value": "{{{_ingest.timestamp}}}"}}],)print(resp)
Ruby
response = client.ingest.put_pipeline(id: 'my-pipeline',body: {processors: [{set: {description: "Index the ingest timestamp as 'event.ingested'",field: 'event.ingested',value: '{{{_ingest.timestamp}}}'}}]})puts response
Js
const response = await client.ingest.putPipeline({id: "my-pipeline",processors: [{set: {description: "Index the ingest timestamp as 'event.ingested'",field: "event.ingested",value: "{{{_ingest.timestamp}}}",},},],});console.log(response);
Console
PUT _ingest/pipeline/my-pipeline{"processors": [{"set": {"description": "Index the ingest timestamp as 'event.ingested'","field": "event.ingested","value": "{{{_ingest.timestamp}}}"}}]}
パイプラインの失敗の処理
パイプラインのプロセッサは順次実行されます。デフォルトでは、これらのプロセッサの1つが失敗したりエラーに遭遇した場合、パイプライン処理は停止します。
プロセッサの失敗を無視し、パイプラインの残りのプロセッサを実行するには、ignore_failureをtrueに設定します。
Python
resp = client.ingest.put_pipeline(id="my-pipeline",processors=[{"rename": {"description": "Rename 'provider' to 'cloud.provider'","field": "provider","target_field": "cloud.provider","ignore_failure": True}}],)print(resp)
Ruby
response = client.ingest.put_pipeline(id: 'my-pipeline',body: {processors: [{rename: {description: "Rename 'provider' to 'cloud.provider'",field: 'provider',target_field: 'cloud.provider',ignore_failure: true}}]})puts response
Js
const response = await client.ingest.putPipeline({id: "my-pipeline",processors: [{rename: {description: "Rename 'provider' to 'cloud.provider'",field: "provider",target_field: "cloud.provider",ignore_failure: true,},},],});console.log(response);
Console
PUT _ingest/pipeline/my-pipeline{"processors": [{"rename": {"description": "Rename 'provider' to 'cloud.provider'","field": "provider","target_field": "cloud.provider","ignore_failure": true}}]}
#### Python``````pythonresp = client.ingest.put_pipeline(id="my-pipeline",processors=[{"rename": {"description": "Rename 'provider' to 'cloud.provider'","field": "provider","target_field": "cloud.provider","on_failure": [{"set": {"description": "Set 'error.message'","field": "error.message","value": "Field 'provider' does not exist. Cannot rename to 'cloud.provider'","override": False}}]}}],)print(resp)`
Ruby
response = client.ingest.put_pipeline(id: 'my-pipeline',body: {processors: [{rename: {description: "Rename 'provider' to 'cloud.provider'",field: 'provider',target_field: 'cloud.provider',on_failure: [{set: {description: "Set 'error.message'",field: 'error.message',value: "Field 'provider' does not exist. Cannot rename to 'cloud.provider'",override: false}}]}}]})puts response
Js
const response = await client.ingest.putPipeline({id: "my-pipeline",processors: [{rename: {description: "Rename 'provider' to 'cloud.provider'",field: "provider",target_field: "cloud.provider",on_failure: [{set: {description: "Set 'error.message'",field: "error.message",value:"Field 'provider' does not exist. Cannot rename to 'cloud.provider'",override: false,},},],},},],});console.log(response);
Console
PUT _ingest/pipeline/my-pipeline{"processors": [{"rename": {"description": "Rename 'provider' to 'cloud.provider'","field": "provider","target_field": "cloud.provider","on_failure": [{"set": {"description": "Set 'error.message'","field": "error.message","value": "Field 'provider' does not exist. Cannot rename to 'cloud.provider'","override": false}}]}}]}
ネストされたエラーハンドリングのために、on_failureプロセッサのリストをネストします。
Python
resp = client.ingest.put_pipeline(id="my-pipeline",processors=[{"rename": {"description": "Rename 'provider' to 'cloud.provider'","field": "provider","target_field": "cloud.provider","on_failure": [{"set": {"description": "Set 'error.message'","field": "error.message","value": "Field 'provider' does not exist. Cannot rename to 'cloud.provider'","override": False,"on_failure": [{"set": {"description": "Set 'error.message.multi'","field": "error.message.multi","value": "Document encountered multiple ingest errors","override": True}}]}}]}}],)print(resp)
Ruby
response = client.ingest.put_pipeline(id: 'my-pipeline',body: {processors: [{rename: {description: "Rename 'provider' to 'cloud.provider'",field: 'provider',target_field: 'cloud.provider',on_failure: [{set: {description: "Set 'error.message'",field: 'error.message',value: "Field 'provider' does not exist. Cannot rename to 'cloud.provider'",override: false,on_failure: [{set: {description: "Set 'error.message.multi'",field: 'error.message.multi',value: 'Document encountered multiple ingest errors',override: true}}]}}]}}]})puts response
Js
const response = await client.ingest.putPipeline({id: "my-pipeline",processors: [{rename: {description: "Rename 'provider' to 'cloud.provider'",field: "provider",target_field: "cloud.provider",on_failure: [{set: {description: "Set 'error.message'",field: "error.message",value:"Field 'provider' does not exist. Cannot rename to 'cloud.provider'",override: false,on_failure: [{set: {description: "Set 'error.message.multi'",field: "error.message.multi",value: "Document encountered multiple ingest errors",override: true,},},],},},],},},],});console.log(response);
Console
PUT _ingest/pipeline/my-pipeline{"processors": [{"rename": {"description": "Rename 'provider' to 'cloud.provider'","field": "provider","target_field": "cloud.provider","on_failure": [{"set": {"description": "Set 'error.message'","field": "error.message","value": "Field 'provider' does not exist. Cannot rename to 'cloud.provider'","override": false,"on_failure": [{"set": {"description": "Set 'error.message.multi'","field": "error.message.multi","value": "Document encountered multiple ingest errors","override": true}}]}}]}}]}
パイプラインにon_failureを指定することもできます。on_failure値のないプロセッサが失敗した場合、Elasticsearchはこのパイプラインレベルのパラメータをフォールバックとして使用します。Elasticsearchは、パイプラインの残りのプロセッサを実行しようとはしません。
Console
PUT _ingest/pipeline/my-pipeline{"processors": [ ... ],"on_failure": [{"set": {"description": "Index document to 'failed-<index>'","field": "_index","value": "failed-{{{ _index }}}"}}]}
パイプラインの失敗に関する追加情報は、ドキュメントメタデータフィールドon_failure_message、on_failure_processor_type、on_failure_processor_tag、およびon_failure_pipelineで利用できる場合があります。これらのフィールドは、on_failureブロック内からのみアクセス可能です。
次の例では、メタデータフィールドを使用して、ドキュメント内にパイプラインの失敗に関する情報を含めます。
Console
PUT _ingest/pipeline/my-pipeline{"processors": [ ... ],"on_failure": [{"set": {"description": "Record error information","field": "error_information","value": "Processor {{ _ingest.on_failure_processor_type }} with tag {{ _ingest.on_failure_processor_tag }} in pipeline {{ _ingest.on_failure_pipeline }} failed with message {{ _ingest.on_failure_message }}"}}]}
プロセッサを条件付きで実行
各プロセッサは、Painlessスクリプトとして記述されたオプションのif条件をサポートしています。提供された場合、プロセッサはif条件がtrueのときのみ実行されます。
#### Python``````pythonresp = client.ingest.put_pipeline(id="my-pipeline",processors=[{"drop": {"description": "Drop documents with 'network.name' of 'Guest'","if": "ctx?.network?.name == 'Guest'"}}],)print(resp)`
Ruby
response = client.ingest.put_pipeline(id: 'my-pipeline',body: {processors: [{drop: {description: "Drop documents with 'network.name' of 'Guest'",if: "ctx?.network?.name == 'Guest'"}}]})puts response
Js
const response = await client.ingest.putPipeline({id: "my-pipeline",processors: [{drop: {description: "Drop documents with 'network.name' of 'Guest'",if: "ctx?.network?.name == 'Guest'",},},],});console.log(response);
Console
PUT _ingest/pipeline/my-pipeline{"processors": [{"drop": {"description": "Drop documents with 'network.name' of 'Guest'","if": "ctx?.network?.name == 'Guest'"}}]}
script.painless.regex.enabledクラスタ設定が有効になっている場合、if条件スクリプトで正規表現を使用できます。サポートされている構文については、Painless正規表現を参照してください。
可能であれば、正規表現の使用を避けてください。高コストの正規表現はインデックス作成速度を遅くする可能性があります。
Python
resp = client.ingest.put_pipeline(id="my-pipeline",processors=[{"set": {"description": "If 'url.scheme' is 'http', set 'url.insecure' to true","if": "ctx.url?.scheme =~ /^http[^s]/","field": "url.insecure","value": True}}],)print(resp)
Ruby
response = client.ingest.put_pipeline(id: 'my-pipeline',body: {processors: [{set: {description: "If 'url.scheme' is 'http', set 'url.insecure' to true",if: 'ctx.url?.scheme =~ /^http[^s]/',field: 'url.insecure',value: true}}]})puts response
Js
const response = await client.ingest.putPipeline({id: "my-pipeline",processors: [{set: {description: "If 'url.scheme' is 'http', set 'url.insecure' to true",if: "ctx.url?.scheme =~ /^http[^s]/",field: "url.insecure",value: true,},},],});console.log(response);
Console
PUT _ingest/pipeline/my-pipeline{"processors": [{"set": {"description": "If 'url.scheme' is 'http', set 'url.insecure' to true","if": "ctx.url?.scheme =~ /^http[^s]/","field": "url.insecure","value": true}}]}
可能であれば、複雑または高コストの`````if`````条件スクリプトの使用を避けてください。高コストの条件スクリプトはインデックス作成速度を遅くする可能性があります。#### Python``````pythonresp = client.ingest.put_pipeline(id="my-pipeline",processors=[{"drop": {"description": "Drop documents that don't contain 'prod' tag","if": "\n Collection tags = ctx.tags;\n if(tags != null){\n for (String tag : tags) {\n if (tag.toLowerCase().contains('prod')) {\n return false;\n }\n }\n }\n return true;\n "}}],)print(resp)`
Js
const response = await client.ingest.putPipeline({id: "my-pipeline",processors: [{drop: {description: "Drop documents that don't contain 'prod' tag",if: "\n Collection tags = ctx.tags;\n if(tags != null){\n for (String tag : tags) {\n if (tag.toLowerCase().contains('prod')) {\n return false;\n }\n }\n }\n return true;\n ",},},],});console.log(response);
Console
PUT _ingest/pipeline/my-pipeline{"processors": [{"drop": {"description": "Drop documents that don't contain 'prod' tag","if": """Collection tags = ctx.tags;if(tags != null){for (String tag : tags) {if (tag.toLowerCase().contains('prod')) {return false;}}}return true;"""}}]}
if条件としてストアドスクリプトを指定することもできます。
Python
resp = client.put_script(id="my-prod-tag-script",script={"lang": "painless","source": "\n Collection tags = ctx.tags;\n if(tags != null){\n for (String tag : tags) {\n if (tag.toLowerCase().contains('prod')) {\n return false;\n }\n }\n }\n return true;\n "},)print(resp)resp1 = client.ingest.put_pipeline(id="my-pipeline",processors=[{"drop": {"description": "Drop documents that don't contain 'prod' tag","if": {"id": "my-prod-tag-script"}}}],)print(resp1)
Js
const response = await client.putScript({id: "my-prod-tag-script",script: {lang: "painless",source:"\n Collection tags = ctx.tags;\n if(tags != null){\n for (String tag : tags) {\n if (tag.toLowerCase().contains('prod')) {\n return false;\n }\n }\n }\n return true;\n ",},});console.log(response);const response1 = await client.ingest.putPipeline({id: "my-pipeline",processors: [{drop: {description: "Drop documents that don't contain 'prod' tag",if: {id: "my-prod-tag-script",},},},],});console.log(response1);
Console
PUT _scripts/my-prod-tag-script{"script": {"lang": "painless","source": """Collection tags = ctx.tags;if(tags != null){for (String tag : tags) {if (tag.toLowerCase().contains('prod')) {return false;}}}return true;"""}}PUT _ingest/pipeline/my-pipeline{"processors": [{"drop": {"description": "Drop documents that don't contain 'prod' tag","if": { "id": "my-prod-tag-script" }}}]}
受信ドキュメントにはオブジェクトフィールドが含まれていることがよくあります。プロセッサスクリプトが親オブジェクトが存在しないフィールドにアクセスしようとすると、ElasticsearchはNullPointerExceptionを返します。これらの例外を回避するには、https://www.elastic.co/guide/en/elasticsearch/painless/8.15/painless-operators-reference.html#null-safe-operatorのnull安全演算子(?.など)を使用し、スクリプトをnull安全に記述します。
たとえば、ctx.network?.name.equalsIgnoreCase('Guest')はnull安全ではありません。ctx.network?.nameはnullを返す可能性があります。スクリプトを'Guest'.equalsIgnoreCase(ctx.network?.name)として書き直します。これは、Guestが常に非nullであるため、null安全です。
スクリプトをnull安全に書き直せない場合は、明示的なnullチェックを含めてください。
Python
resp = client.ingest.put_pipeline(id="my-pipeline",processors=[{"drop": {"description": "Drop documents that contain 'network.name' of 'Guest'","if": "ctx.network?.name != null && ctx.network.name.contains('Guest')"}}],)print(resp)
Js
const response = await client.ingest.putPipeline({id: "my-pipeline",processors: [{drop: {description: "Drop documents that contain 'network.name' of 'Guest'",if: "ctx.network?.name != null && ctx.network.name.contains('Guest')",},},],});console.log(response);
Console
PUT _ingest/pipeline/my-pipeline{"processors": [{"drop": {"description": "Drop documents that contain 'network.name' of 'Guest'","if": "ctx.network?.name != null && ctx.network.name.contains('Guest')"}}]}
条件付きでパイプラインを適用
#### Python``````pythonresp = client.ingest.put_pipeline(id="one-pipeline-to-rule-them-all",processors=[{"pipeline": {"description": "If 'service.name' is 'apache_httpd', use 'httpd_pipeline'","if": "ctx.service?.name == 'apache_httpd'","name": "httpd_pipeline"}},{"pipeline": {"description": "If 'service.name' is 'syslog', use 'syslog_pipeline'","if": "ctx.service?.name == 'syslog'","name": "syslog_pipeline"}},{"fail": {"description": "If 'service.name' is not 'apache_httpd' or 'syslog', return a failure message","if": "ctx.service?.name != 'apache_httpd' && ctx.service?.name != 'syslog'","message": "This pipeline requires service.name to be either `syslog` or `apache_httpd`"}}],)print(resp)`
Ruby
response = client.ingest.put_pipeline(id: 'one-pipeline-to-rule-them-all',body: {processors: [{pipeline: {description: "If 'service.name' is 'apache_httpd', use 'httpd_pipeline'",if: "ctx.service?.name == 'apache_httpd'",name: 'httpd_pipeline'}},{pipeline: {description: "If 'service.name' is 'syslog', use 'syslog_pipeline'",if: "ctx.service?.name == 'syslog'",name: 'syslog_pipeline'}},{fail: {description: "If 'service.name' is not 'apache_httpd' or 'syslog', return a failure message",if: "ctx.service?.name != 'apache_httpd' && ctx.service?.name != 'syslog'",message: 'This pipeline requires service.name to be either `syslog` or `apache_httpd`'}}]})puts response
Js
const response = await client.ingest.putPipeline({id: "one-pipeline-to-rule-them-all",processors: [{pipeline: {description:"If 'service.name' is 'apache_httpd', use 'httpd_pipeline'",if: "ctx.service?.name == 'apache_httpd'",name: "httpd_pipeline",},},{pipeline: {description: "If 'service.name' is 'syslog', use 'syslog_pipeline'",if: "ctx.service?.name == 'syslog'",name: "syslog_pipeline",},},{fail: {description:"If 'service.name' is not 'apache_httpd' or 'syslog', return a failure message",if: "ctx.service?.name != 'apache_httpd' && ctx.service?.name != 'syslog'",message:"This pipeline requires service.name to be either `syslog` or `apache_httpd`",},},],});console.log(response);
Console
PUT _ingest/pipeline/one-pipeline-to-rule-them-all{"processors": [{"pipeline": {"description": "If 'service.name' is 'apache_httpd', use 'httpd_pipeline'","if": "ctx.service?.name == 'apache_httpd'","name": "httpd_pipeline"}},{"pipeline": {"description": "If 'service.name' is 'syslog', use 'syslog_pipeline'","if": "ctx.service?.name == 'syslog'","name": "syslog_pipeline"}},{"fail": {"description": "If 'service.name' is not 'apache_httpd' or 'syslog', return a failure message","if": "ctx.service?.name != 'apache_httpd' && ctx.service?.name != 'syslog'","message": "This pipeline requires service.name to be either `syslog` or `apache_httpd`"}}]}
パイプライン使用統計の取得
node stats APIを使用して、グローバルおよびパイプラインごとのインジェスト統計を取得します。これらの統計を使用して、最も頻繁に実行されるパイプラインや、処理に最も時間がかかるパイプラインを特定します。
Python
resp = client.nodes.stats(metric="ingest",filter_path="nodes.*.ingest",)print(resp)
Ruby
response = client.nodes.stats(metric: 'ingest',filter_path: 'nodes.*.ingest')puts response
Js
const response = await client.nodes.stats({metric: "ingest",filter_path: "nodes.*.ingest",});console.log(response);
Console
GET _nodes/stats/ingest?filter_path=nodes.*.ingest
